Introduction
In this guide we will learn how and to what degree we can control where assets from your integration are uploaded.
What will I need?
If you haven't read the Implementing C2C: Setting Up guide, give it a quick glance before moving on!
You will also need the access_token you received during the C2C hardware or C2C Application authentication and authorization guide.
Asset folder structure
By default, assets are created with the following folder structure:
Cloud Devices > {YYYY}_{MM}_{DD} > {ASSET_TYPE} > {YOUR_DEVICE} > {ASSET_NAME}
Where {ASSET_TYPE} is either VIDEO, AUDIO, or DATA (configured for your device model per-channel), {YOUR_DEVICE} is the name of the project device connected to the user's project, and {ASSET_NAME} is the name of the asset you uploaded and is the actual playable asset in Frame.io.
Extension routing
You can set your device up to route different assets to custom {ASSET_TYPE} folders based on a file extension in {ASSET_NAME}. For instance, let's say your integration has a number of different file types it produces that each belong to a specific provenance. You can tell us to map those assets like so:
.mov -> VIDEO
.mp4 -> VIDEO
.raw -> STILLS
.jpeg -> STILLS
.pdf -> CAMERA REPORTS
.las -> LiDAR Scans
Now when you crete the following asset:
{
curl -X POST https://api.frame.io/v2/assets \
    --header 'Authorization: Bearer [access_codes]' \
    --header 'Content-Type: application/json' \
    --header 'x-client-version: 2.0.0' \
    --data-binary @- <<'__JSON__'
        {
            "name": "IMAGE_0001.jpeg",
            "filetype": "image/jpeg",
            "filesize": 21136250,
            "offset": 10
        }
__JSON__
} | python -m json.toolDocs for /v2/assets can be found here
... it will be routed to a location like: Cloud Devices > 2022_04_01 > STILLS > MY_DEVICE > IMAGE_0001.jpeg.
If the file were instead called A001_C001.mov, it would be routed to: Cloud Devices > 2022_04_01 > VIDEO > MY_DEVICE > A001_C001.mov.
Tokenized upload paths
Some integrations may wish to have more control over the folder structure their device creates. In turn, we at Frame.io need to make sure that there is some level of consistency in how files are uploaded to Frame.io from a C2C device, and specifically make guarantees to Frame.io customers about what part of their project a C2C device can interact with. To that end, we allow integrators to customize their asset upload locations within the {YOUR_DEVICE} folder, but do not allow assets to be uploaded outside of that folder.
To upload to a custom folder structure, you will need to work with your Partner Manager. Custom folder structures are a set of tokenized metadata that must be supplied on asset creation. Let's do a simple example:
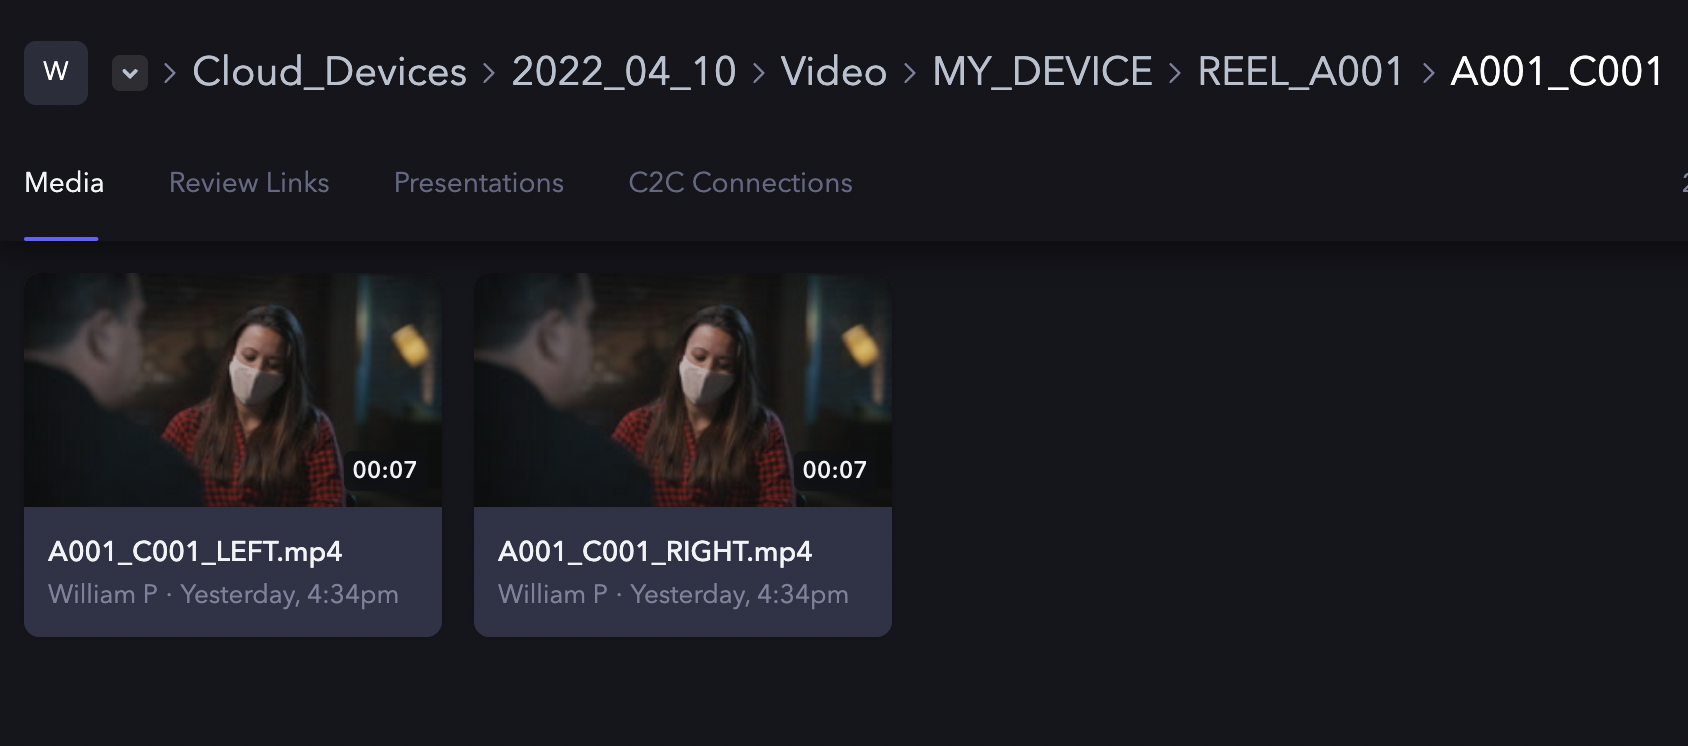
Let's say we have a 3D camera rig that has reel_name values like "A001", "A002", "A003", etc, and clip_number values like "C001", "C002", etc. We want to create folders for each clip and populate those with the left and right eye files, so the files would look like this in a project:
To do this, we will need to configure two settings:
- Required metadata fields
- Tokenized file path
Required metadata fields are a simple list of keys that must be set on asset creation for your integration:
[reel_name, clip_number]You can then use any of these keys to create a /-delimitated path, using {field_name} to denote where a field's value should be injected:
REEL_{reel_name}/{reel_name}_{clip_number}Both of these settings will have to be given to our team at Frame.io to add as part of your integration's details. After we set that up, when you create an asset, those values will have to be supplied at the root of the payload in order for the asset creation to be successful:
{
curl -X POST https://api.frame.io/v2/assets \
    --header 'Authorization: Bearer [access_token]' \
    --header 'Content-Type: application/json' \
    --header 'x-client-version: 2.0.0' \
    --data-binary @- <<'__JSON__'
        {
            "name": "A001_C001_LEFT.mp4",
            "filetype": "video/mp4",
            "filesize": 21136250,
            "offset": 10,
            "metadata": {
              "reel_name": "A001",
              "clip_number": "C001"
            },
        }
__JSON__
} | python -m json.tool
The above will create a file with a full path like: Cloud Devices > 2022_04_01 > VIDEO > MY_DEVICE > REEL_A001 > A001_C001 > A001_C001_LEFT.mp4
If your device has not been explicitly set up to allow these fields, you will receive an error if you try to make the same call. Likewise, if you set up required metadata fields, you MUST supply them in the asset create payload or an error will be returned.
The payload will accept any valid JSON value. Non-string values are rendered in the following way:
- integers: Rendered in base-10:
10->"10" - floats: Uses the shortest representation according to algorithm described in "Printing Floating-Point Numbers Quickly and Accurately" in Proceedings of the SIGPLAN '96 Conference on Programming Language Design and Implementation.
- booleans:
trueandfalseare rendered as"true"and"false" - null: Rendered as an empty string. If
reel_namewhere set tonull, then the first custom folder would be rendered asREEL_
In general we suggest that you limit your values to strings, and format other values as you see fit (for instance, integers will always be printed without leading zeroes, something you may want to change).
In general, only fields which have a valid value for every clip should be used; if a field does not always have a valid value, you should have a plan for how to represent unset or null values.
Version stacking
Frame.io supports version stacks — a way to bundle multiple iterations of the same content in the UI. The C2C API allows for devices to upload new iterations of an asset that will be put into a version stack with its previous versions.
In order to create a version stack, you must supply an autoversion_id to identify what version stack the assets belong to. This value can be anything: a UUID, a filename, etc. Be careful to only use values that will never be unintentionally repeated in an asset folder. For instance, if it's possible your integration may create the same filename more than once, then filename is not a good candidate to use for autoversion_id.
We supply an autoversion_id like so:
{
curl -X POST https://api.frame.io/v2/assets \
    --header 'Authorization: Bearer [access_token]' \
    --header 'Content-Type: application/json' \
    --header 'x-client-version: 2.0.0' \
    --data-binary @- <<'__JSON__'
        {
            "name": "A001_C001_v01.mov",
            "filetype": "video/webm",
            "filesize": 21136250,
            "offset": 10,
            "autoversion_id": "033e22ae-8544-4c9b-a84c-fcc140b0dd16"
        }
__JSON__
} | python -m json.tool
Now, whenever you upload a new asset, if you use the same autoversion_id, the asset will be added as the latest version in a stack with the original asset:
{
curl -X POST https://api.frame.io/v2/assets \
    --header 'Authorization: Bearer [access_token]' \
    --header 'Content-Type: application/json' \
    --header 'x-client-version: 2.0.0' \
    --data-binary @- <<'__JSON__'
        {
            "name": "A001_C001_v02_with_color.mov",
            "filetype": "video/webm",
            "filesize": 21136250,
            "offset": 10,
            "autoversion_id": "033e22ae-8544-4c9b-a84c-fcc140b0dd16"
        }
__JSON__
} | python -m json.tool
Assets will only stack if they are uploaded to the same folder, so you will need to keep a couple things in mind if you wish to implement version stacking:
- Tokenized metadata must resolve to the same parent folder for the version stack to be created.
- Because the creation date is part of the file path, new versions created after midnight UTC may not stack correctly unless you supply an offset for the original upload's creation time.
This second point is important. Let's say 48 hours after the initial upload, a new version of the asset is created. In order to stack with the original asset, we must supply an offset that is 48 hours in the past: 172800 seconds.
{
curl -X POST https://api.frame.io/v2/assets \
    --header 'Authorization: Bearer [access_token]' \
    --header 'Content-Type: application/json' \
    --header 'x-client-version: 2.0.0' \
    --data-binary @- <<'__JSON__'
        {
            "name": "A001_C001_v03_with_color.mov",
            "filetype": "video/webm",
            "filesize": 21136250,
            "offset": 172800,
            "autoversion_id": "033e22ae-8544-4c9b-a84c-fcc140b0dd16"
        }
__JSON__
} | python -m json.tool
If the current asset would have been uploaded to 2022_04_03, it will now be uploaded to 2022_04_01 and stack with the correct asset.