If you'd like to build your own Custom Actions app, our sample apps will help you get started:
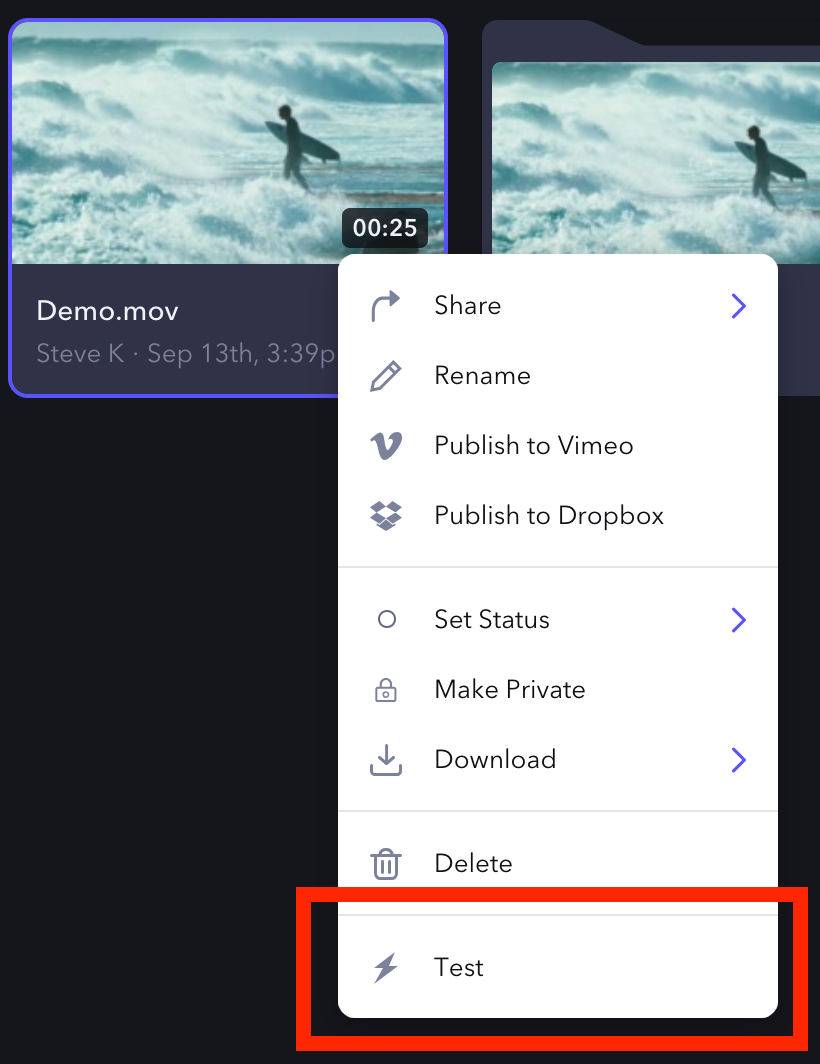
Custom actions are a way for you to build integrations directly into Frame.io as programmable UI components. This enables a whole class of workflows that can be triggered by users within the app, leveraging the same underlying events routing as Webhooks. Currently, custom actions are available for Assets, and are displayed in the contextual / right-click dropdown menu available on any Asset, as shown in the image below.
An Asset is a robust representation of a file in S3, and its context in Frame.io. This includes transcodes, user/team/project context, and metadata. When a user clicks a custom action on an Asset, Frame.io will send a payload to a URL you provide. The receiving application may then respond with an HTTP status code to simply acknowledge receipt, or may respond with a custom callback that can render additional UI in Frame.io.
Setup your Custom Action
Team Manager permissions are required to create Customer Actions for a Team. Ask your admin to modify your permissions if you don't have access.
Custom actions can be configured in the Custom Actions area of developer.frame.io. An action requires:
| Field name | Description |
|---|---|
| Name | The name you choose for your custom action. It will be shown in the menu of available custom actions in Frame.io. |
| Description | Explain what the action does, for reference (the description won't appear in the Frame.io web app). |
| Event | Internal event key to help you differentiate between standard webhook events and your own. |
| URL | Where to deliver events. |
| Team | The team that will use the custom action. |
Click - What's in the Payload You Receive From Frame.io
When the user clicks your custom action, a payload will be sent to the URL you specified in the URL field.
POST /your/url
{
  "action_id": "2444cccc-7777-4a11-8ddd-05aa45bb956b",
  "interaction_id": "aafa3qq2-c1f6-4111-92b2-4aa64277c33f",
  "project": {
    "id": "a7d6a74b-d45d-4019-9069-24651e0b9f64"
  },
  "resource": {
    "id": "9q2e5555-3a22-44dd-888a-abbb72c3333b",
    "type": "asset"
  },
  "team": {
    "id": "54353cd2-c6ee-4aa1-954a-ce9e19602aa9"
  },
  "type": "my.action",
  "user": {
    "id": "fb57eee0-79f2-4bc7-9b70-99fbc175175c"
  }
}
You can use this payload to identify:
- Which of your custom actions were clicked
- Which resource was clicked
- Which User took the action
| Field name | Description |
|---|---|
action_id | The unique id of this Action. It will always be the same for a given Action. |
interaction_id | This is a unique identifier generated by Frame.io that you can use to keep track of your transaction. This identifier will be the same throughout any single sequence of an Action, including callback forms. |
type | The name of the event you put in the Event field when configuring your Action. |
resource.id | The id of the resource from which you triggered your Action (usually an Asset). |
resource.type | The type of resource from which you triggered your Action (usually asset) |
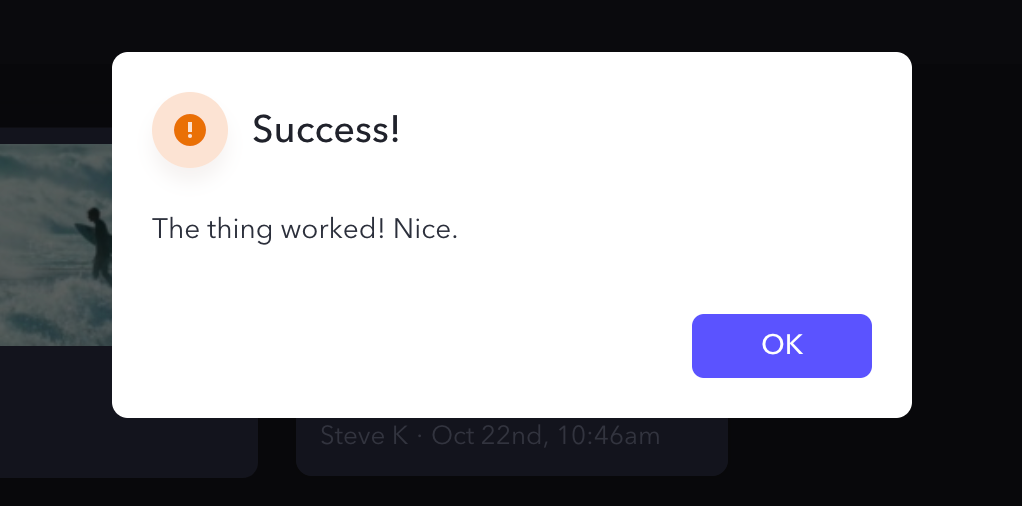
The interaction_id is provided as a unique identifier to help you keep track of the interaction as it evolves over time. If you do not need to respond to the user, simply return a 200 status code, and you're done. While optional, we recommend including some information about the result of the action, like a simple success message or error alert. Custom actions support message callbacks.
Our application expects a response in less than 5 seconds, and will attempt to retry up to 5x while waiting for a succesful response. You should ideally respond immediately and perform any actions asynchronously after triggered via a Custom Action.
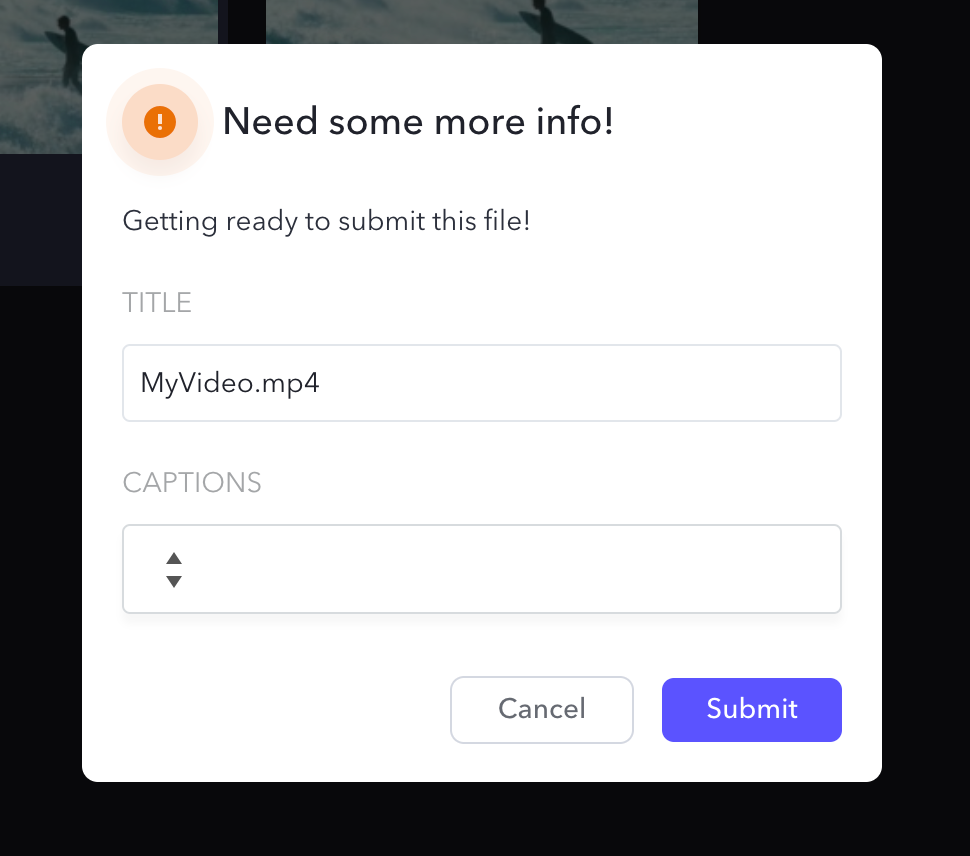
Create a form callback
Let's say that you need more info before you start your process. For example, you may be uploading content to a system that requires additional details and settings. You can “describe” a Form in your response, which the user will actually see! And fill out! And it'll be sent right back to you!
Here's an example form that will render a Form in the Frame.io UI that the initial acting User can fill out and submit:
{
  "title": "Need some more info!",
  "description": "Getting ready to submit this file!",
  "fields": [
    {
      "type": "text",
      "label": "Title",
      "name": "title",
      "value": "MyVideo.mp4"
    },
    {
      "type": "select",
      "label": "Captions",
      "name": "captions",
      "options": [
        {
          "name": "Off",
          "value": "off"
        },
        {
          "name": "On",
          "value": "on"
        }
      ]
    }
  ]
}
When the user submits the form, you'll receive an event on the same URL as the initial POST:
POST /your/url
{
"type": "your-specified-event-name",
"interaction_id": "the-same-id-as-before",
"action_id": "unique-id-for-this-custom-action",
"data":{
"title": "MyVideo.mp4",
"captions": "off"
}
}All the custom fields you added on your form appear in the data section of the JSON payload sent by Frame.io
Use the interaction_id to map the initial request and this new form data. And again, if you'd like, you can respond with a message (or even another form!).
By chaining Actions, Forms, and Messages, you can effectively program entire Asset workflows in Frame.io with business logic from an external system.
Get imaginative! The sky's the limit.
Form details
Like messages, Forms support title and description attributes that render at the top of the Form. Beyond that, each form field accepts the following base attributes:
type-- Tells the Frame.io UI which type of data to expect, and which component and render.label-- Appears on the UI as the header above the field.name-- Key by which the field will be identified on the subsequent payload.value-- Value with which to pre-populate the field.
Supported field types
Text field A simple text field with no additional parameters.
{
  "type": "text",
  "label": "Title",
  "name": "title",
  "value": "MyVideo.mp4"
}
Text area A simple text area with no additional parameters.
{
  "type": "textarea",
  "label": "Description",
  "name": "description",
  "value": "This video is really, really popular."
}
Select list
Defines a picklist that the user can choose from. Must include an options list, each member of which should include a human-readable name, and a machine-parseable value.
{
  "type": "select",
  "label": "Captions",
  "name": "captions",
  "value": "off",
  "options": [
       {
         "name": "Off",
         "value": "off"
       },
       {
         "name": "On",
         "value": "on"
      }
   ]
}Security
By default, all Custom Actions have a signing key generated during their creation. This is not configurable. This key can be used to verify that the request originates from Frame.io.
Verification
Included in the POST request are the following
| Name | Description |
|---|---|
X-Frameio-Request-Timestamp | The time your Custom Action was triggered. |
X-Frameio-Signature | The computed signature. |
The timestamp is the time the request was signed on its way out of Frame.io's network. This can be used to prevent replay attacks. We recommended verifying this time is within 5 minutes of local time.
The signature is a HMAC SHA-256 hash using the signing key provided when the Custom Action is first created.
Verifying the signature
- Extract the signature from the HTTP headers
- Create a message to sign by combining the version, delivery time, and request body
v0:timestamp:body- Compute the HMAC SHA256 signature using your signing secret.
- Note: The provided signature is prefixed with
v0=. Currently Frame.io only has this one version for signing requests. You will need to add this prefix to your computed signature. - Compare!
import hmac
import hashlib

def verify_signature(curr_time, req_time, signature, body, secret):
    """
    Verify webhook/custom action signature
    :Args:
        curr_time (float): Current epoch time
        req_time (float): Request epoch time
        signature (str): Signature provided by the frame.io API for the given request
        body (str): Custom Action body from the received POST
        secret (str): The secret for this Custom Action that you saved when you first created it
    """
    if int(curr_time) - int(req_time) < 500:
        message = 'v0:{}:{}'.format(req_time, body)
        calculated_signature = 'v0={}'.format(hmac.new(
            bytes(secret, 'latin-1'),
            msg=bytes(message, 'latin-1'),
            digestmod=hashlib.sha256).hexdigest())
        if calculated_signature == signature:
            return True
    return False